6 Neck Posture Exercises That Fix Forward Head & Back Pain
Chin Tucks (Neck Retraction Exercise)
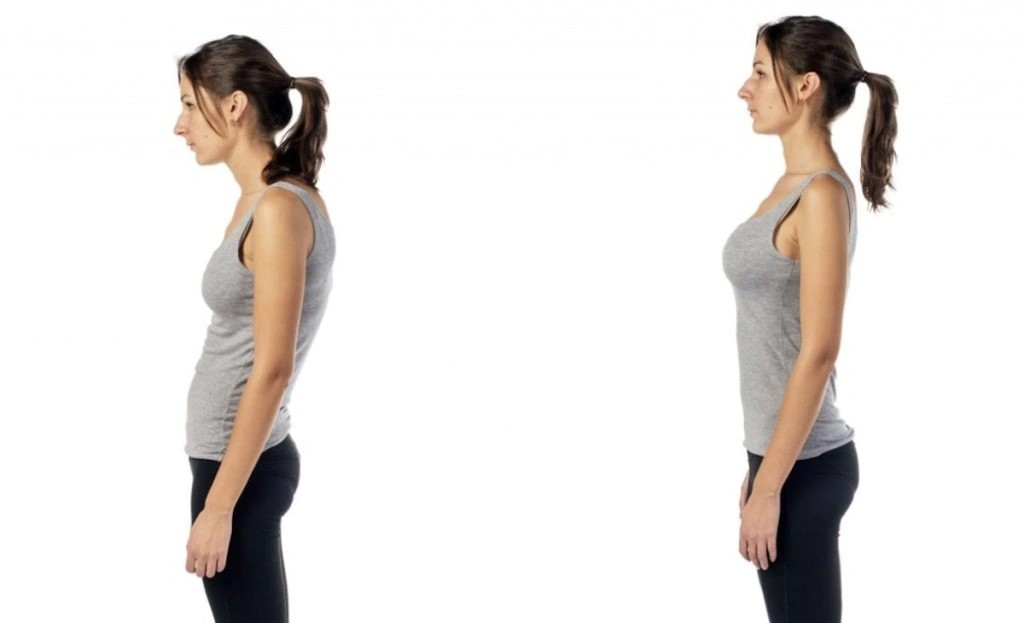
The chin tuck exercise directly reverses the forward head position that creates neck strain. This movement strengthens the deep cervical flexors and stretches overactive muscles at the base of the skull. It ranks among the most effective exercises to fix neck posture.
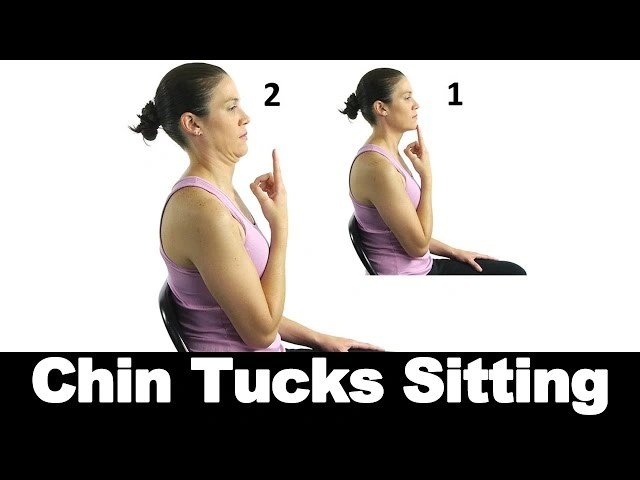
How to Perform Chin Tucks Start by sitting upright or standing with your feet flat on the floor. The exercise involves three simultaneous actions that work together. First, lengthen your spine upward as though someone is pulling you from the crown of your head. Second, draw your head straight back without tilting up or down. Third, tuck your chin to create a double chin while you maintain that upward stretch. Place your fingertips on your chin as a reference point. Pull your chin and head straight back until you feel a stretch at the base of your skull and top of the neck. Your fingers should not move. You should now see separation between your chin and fingers. The movement is horizontal, not a nod downward. Think of sliding your head back against a wall or pulling away from a gentle push on your forehead. , then return to the starting position slowly. Perform the exercise at least 4 to 5 times per day with sets of 7 to 10 repetitions. Control the back-and-forth motion in both directions.Hold this retracted position for 2 to 5 seconds
Benefits of Chin Tucks This exercise activates the cervical erector spinae and deep neck flexor muscles, which remain underactive in people with forward head posture. These muscles allow your head to arrange itself over your shoulders instead of drifting forward once you strengthen them. The stretch targets the suboccipital muscles and upper trapezius. It releases accumulated tension from prolonged sitting. Most people who perform chin tucks consistently . You'll notice improvements in comfort and posture within 2 to 4 weeks of regular practice. The exercise helps reduce tension headaches that originate at the base of the skull. It also trains your postural neuromuscular control, which supports long-term arrangement.report meaningful reduction in upper neck tightness within two weeks
Common Mistakes to Avoid The most frequent error involves confusing retraction with flexion. Nodding your chin down toward your chest is neck flexion, not a chin tuck. The movement must be horizontal. Avoid tilting your chin upward or forcing it excessively downward, as neither position targets the intended muscles. A slouched position with rounded shoulders negates the exercise benefits if you start from there. Your spine needs reasonable upright arrangement before you begin the movement. Don't arch your back or allow your upper body to rock backward. Only your head and neck should move while everything else remains still.
Tips for Better Results Begin each practice session in front of a mirror to verify proper form. Attach the exercise to existing habits for consistency. Perform a set each time you sit at your desk, at every red light during your commute, or while you wait for coffee to brew. Loop an exercise band around the back of your head while holding the ends at eye level to progress further. Perform the chin tuck against band resistance while extending your elbows. This creates additional challenge for the cervical extensors. Keep your chest lifted and breathe normally throughout each repetition. The accumulated practice over weeks changes your head's resting position into better arrangement.
Wall Angels
Wall angels provide constant tactile feedback through wall contact. This makes them effective for correcting rounded shoulders and forward head posture. The exercise at the same time. These muscles work together to pull your shoulders back and support proper alignment.activates the upper trapezius, middle trapezius, lower trapezius, rhomboids, serratus anterior, deltoids, and rotator cuff muscles
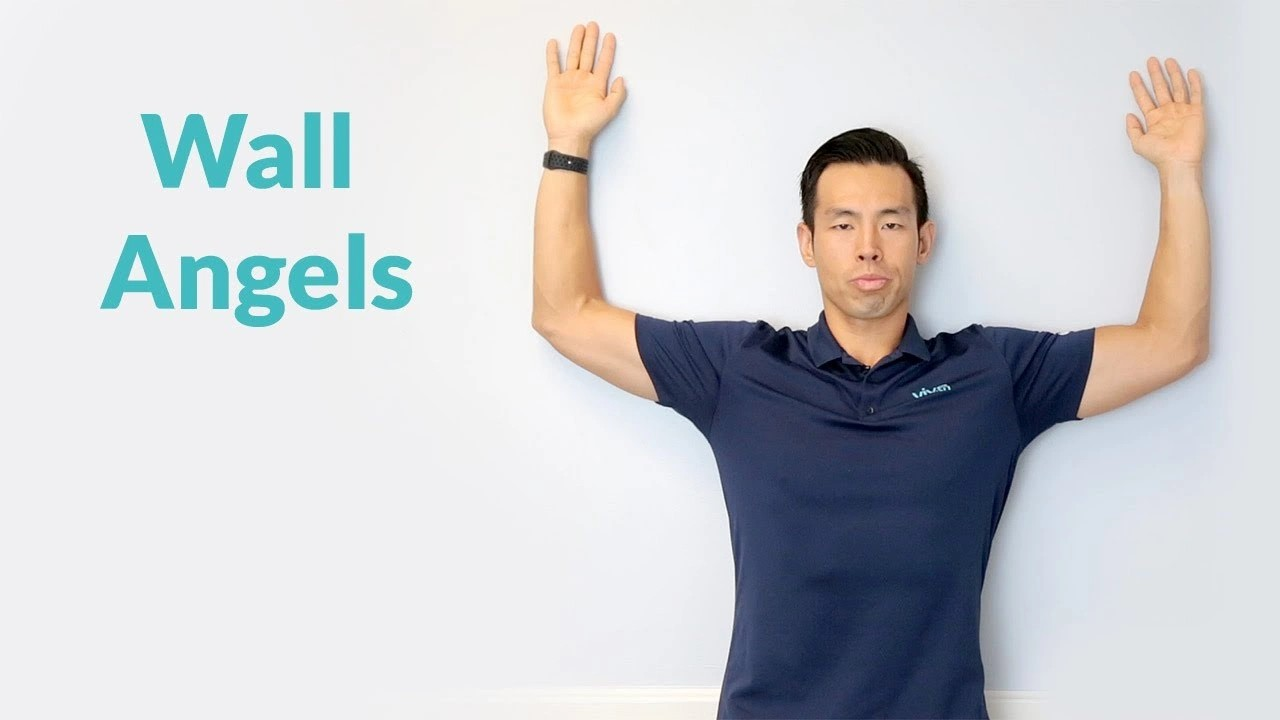
How to Perform Wall Angels Stand with your back against a wall. Place your feet 6 to 12 inches away from the base. Bend your knees a bit for comfort. Press your lower back, upper back and head against the wall while you engage your core to maintain this three-point contact. Tuck your chin a bit and attempt to touch your head's back to the wall without forcing it. Place a small pillow behind your head if this is difficult. Place your arms against the wall with elbows bent at 90 degrees to form a W shape. Your elbows, wrists and your hands' backs should touch the wall. Slide your arms upward along the wall and maintain contact throughout the movement until they form a Y shape overhead. The motion resembles making snow angels while standing. Lower your arms back to the starting W position with control and keep all contact points against the wall. , or 8 to 12 slow repetitions. Focus on proper form rather than speed. Practice 2 to 3 sets, 3 to 5 times per week. Breathe naturally and avoid holding your breath with each repetition.Perform 10 to 15 repetitions
Benefits of Wall Angels Wall angels strengthen the muscles that support upright posture. They counter slouching and forward head position. The exercise increases shoulder range of motion and flexibility while it stretches the pectoral muscles that become shortened from desk work. Better shoulder function comes from strengthening the scapular stabilizers, and this reduces the risk of shoulder injuries. The movement improves thoracic spine mobility, which you need for overhead exercises like squats and pressing movements. Wall angels also reduce tension and discomfort in the neck and shoulders by improving muscle balance and alignment. Most people experience reduced upper back tightness and improved posture awareness within weeks of consistent practice.
Common Mistakes to Avoid You defeat the exercise purpose when you arch your lower back to force arms overhead. Keep your lower back pressed flat against the wall by engaging your core throughout the movement. Unnecessary tension comes from shoulders that shrug toward your ears. Keep them relaxed and pulled down. You're forcing the movement if you raise your arms beyond your current mobility range while losing wall contact. Work within your available range at first. Muscle activation reduces when you move too quickly. Perform each repetition with careful control. Never let your buttocks, back or head come off the wall during the movement.
Tips for Better Results Reduce your range of motion for now if maintaining arm contact is challenging. Flexibility improves with consistent practice. Loop a light resistance band between your hands and add tempo work, such as 3 to 5 seconds up and down, to progress. Wall angels every day remain safe and beneficial if you're a desk worker experiencing daily tightness. Add this exercise to your warm-up routine on training days for maximum effect.
Pec Stretch (Doorway Chest Stretch)
Tight chest muscles pull your shoulders forward and contribute to forward head posture. The doorway pec stretch opens up the chest by stretching the pectoralis major and minor. This reduces forward rounded shoulders and hunched postures that develop from prolonged sitting. When you lengthen these muscles, shoulder and neck mobility improves.
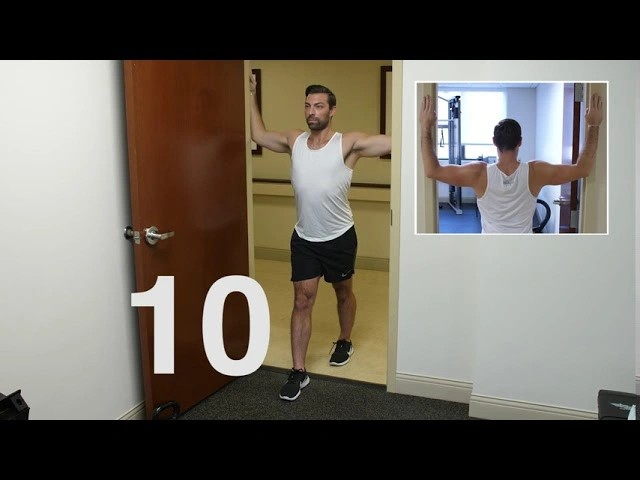
How to Perform the Pec Stretch Stand in an open doorway and raise each arm to the side. Bend at 90-degree angles with palms facing forward. Rest your palms and forearms on the door frame at shoulder height or lower. Move your elbows down if this position feels too intense. Step forward with one foot. Lean your trunk and chest forward through the doorway until you feel a stretch across the front of your chest and shoulders. Keep your shoulder blades pulled back and down, away from your ears, and maintain an upright posture. Avoid leaning your entire body forward or letting your lower back arch. and breathe throughout. Step back and relax, then repeat 3 to 5 times.Hold this position for 20 to 30 seconds Place your arms lower on the doorframe at waist or hip level for a variation that targets deeper fibers. Step forward farther than the standard position, then push off your back foot to intensify the stretch while keeping your arms extended. This alternative often produces a stronger stretch sensation.
Benefits of the Pec Stretch Research demonstrates that doorway stretch and glenohumeral internal rotation range of motion. The stretch also improves scapular position, which benefits those looking to reduce throwing injuries and shoulder dysfunction. When you stretch the pectoralis major and minor, you counteract the shortened muscle state caused by computer work and phone use. This supports better posture alignment.substantially increases pectoralis minor muscle length Opening tight chest muscles reduces shoulder stiffness and allows your shoulders to sit back in their natural position rather than rolling forward. This postural change decreases neck strain and supports the alignment work accomplished through other neck posture exercises.
Common Mistakes to Avoid When you arch your lower back, you negate the stretch benefits and strain your lumbar spine. Keep your core involved and spine neutral throughout. If you elevate your shoulders toward your ears, you create unnecessary tension. Squeeze your shoulder blades together and keep them down. When you stick your head forward, you defeat the purpose of fixing forward head posture. Maintain neutral head alignment while stretching. If you lean excessively, you increase injury risk without improving the stretch. Lean forward only until you feel a gentle to moderate stretch, never sharp pain.
Tips for Better Results Breathe deeply during the hold. Inhale as you position yourself and exhale to release muscle tension. Adjust arm height to target different muscle fibers and find the position that creates the strongest stretch sensation. Perform chest stretches daily for optimal muscle lengthening. Consistency produces better results than occasional intense sessions.
Neck Flexion (Suboccipital Stretch)
Four small muscles at your skull's base control subtle head movements and upper neck stability. These suboccipital muscles run between your skull and the top two cervical vertebrae, and they fatigue fast when forward head posture pulls your head forward throughout the day. Neck flexion stretches target this tension-prone area and improve cervical spine mobility.
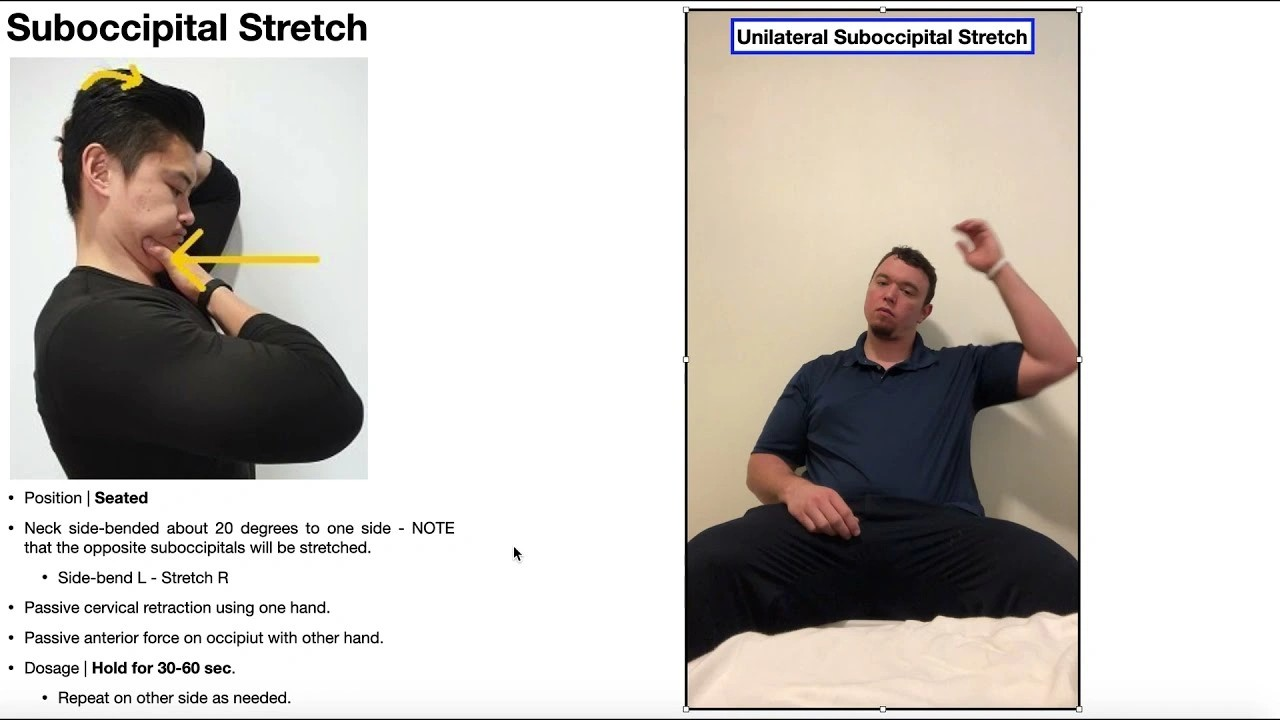
How to Perform Neck Flexion Sit tall in a chair with feet flat on the floor and shoulders relaxed. Keep your back straight and core engaged. Lower your chin toward your chest until you feel a gentle stretch along the back of your neck. A normal range of motion measures . Let your head's weight create the stretch rather than forcing it downward. Hold this position for 20 to 30 seconds, then return to the starting position. Perform 2 to 4 repetitions.between 40 and 80 degrees Try the towel method to get a deeper release. Lie on a mat with folded hand towels placed at the top back of your head and arms relaxed with palms up. The towels create passive traction that decompresses the skull base. Hold this for 30 seconds, rest for 20 seconds, and repeat. Place something firmer under the towel if the stretch feels insufficient. An alternative involves manual pressure. Turn your head away from the side you're working on and locate where your skull meets your neck. Use your middle knuckle to press down and outward along your skull's base. These muscles can be very sensitive, so start with light pressure. Those with limited shoulder mobility can use their thumb to reach under the skull base and apply gentle upward or outward pressure.
Benefits of Neck Flexion This stretch reduces headache frequency and intensity, especially tension headaches that feel like a band around your head. The movement releases built-up tension from stress or screen time and improves posture by counteracting forward head strain. This relieves chronic tightness at the skull base and increases flexibility in the cervical spine.
Common Mistakes to Avoid Forcing your chin down creates sharp pain rather than therapeutic stretch. Stop if you experience dizziness, tingling, or radiating pain. Avoid hunching your shoulders forward or allowing your upper back to round during the movement.
Tips for Better Results Breathe in a slow and even manner throughout each hold. Reduce the thickness and try again if towel height causes symptom aggravation. Combine this stretch with improved desk ergonomics by keeping screens at eye level and raising your phone instead of looking down.
Upper Trapezius Stretch
The trapezius muscle and forms a trapezoid shape that controls upper body mobility. This muscle restricts movement and creates considerable discomfort throughout your neck and shoulders once it gets tight. The upper trapezius stretch addresses this tension through a simple lateral neck movement.spans from the base of your neck across your shoulders down to the middle of your back
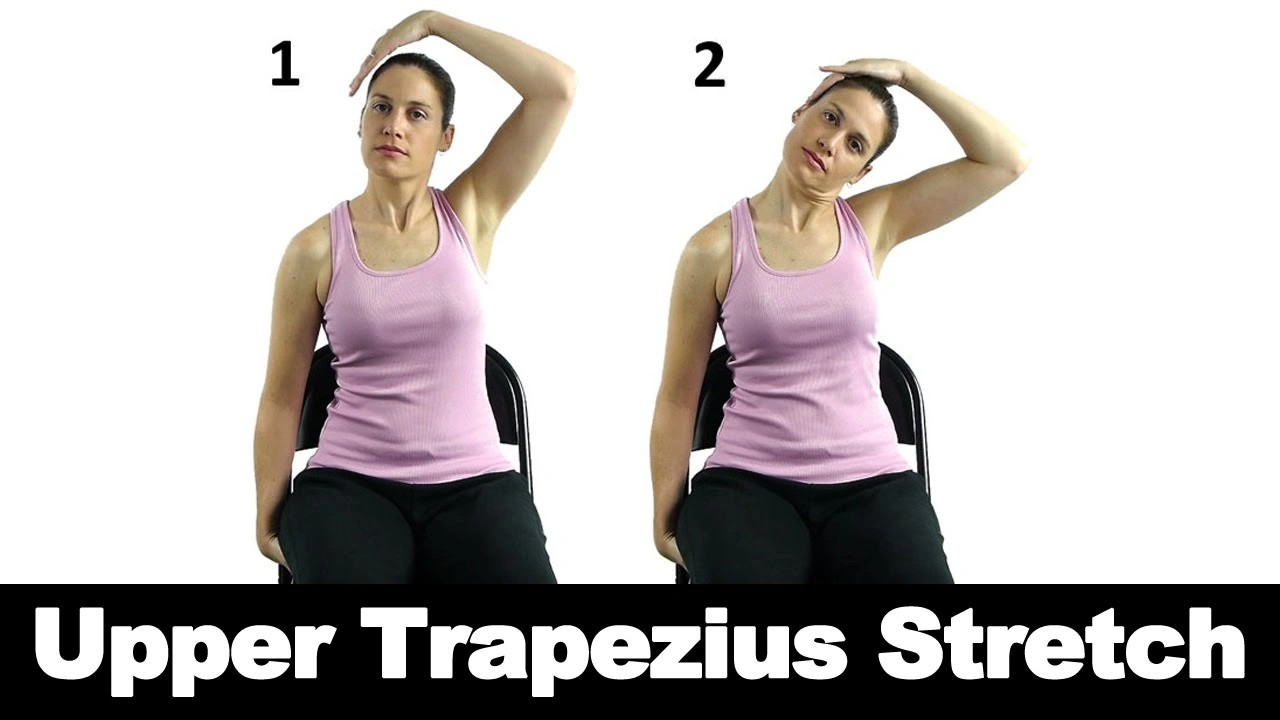
How to Perform Upper Trapezius Stretch Sit or stand upright with relaxed shoulders and good posture. Place one hand behind your back. Tilt your head to the side slowly and bring your ear toward the shoulder opposite from the arm behind your back. Your shoulder may lift as you tilt, but ease your head back toward center until you can relax that shoulder down. You can raise your other hand up and over your head to boost stretch intensity, resting it on the opposite cheekbone. Do not pull your head with this hand. Simply rest it there for a bit more pressure. Breathe deeply and . Release and repeat on the opposite side.hold this position for 20 to 30 seconds Do 2 to 3 repetitions on each side and practice twice daily for optimal results. An alternative involves drawing your head back into a chin tuck position first, then placing one hand behind your back while using the other to stretch your head away from that arm.
Benefits of Upper Trapezius Stretch This stretch increases neck range of motion and releases tension you might not realize you're carrying. Muscle alignment improves and posture follows, reducing injury risk related to the neck and shoulders. The movement helps restore mobility and decreases muscle spasm while contributing to headache reduction. Stress-related tightness responds especially well to this stretch.
Common Mistakes to Avoid You defeat the whole point if you lift the shoulder you're stretching. Keep it relaxed and down. Hard pulling on your head causes harm rather than benefit. Apply only gentle pressure. You create asymmetry if you stretch just one side. Always work both sides. You reduce effectiveness when you rush through repetitions. Give your body time to release the tension.
Tips for Better Results Warm up muscles before stretching to reduce injury risk. Breathe deeply to boost relaxation and stretch effectiveness. Stop if you experience pain and consult a healthcare provider if discomfort persists.
Thoracic Spine Foam Rolling
Foam rolling targets the thoracic spine, a notoriously stiff area that affects your entire body's function. Your lower back and neck compensate when your upper back lacks mobility. This leads to discomfort throughout the spine. Desk workers who spend hours in hunched positions find this exercise especially beneficial.
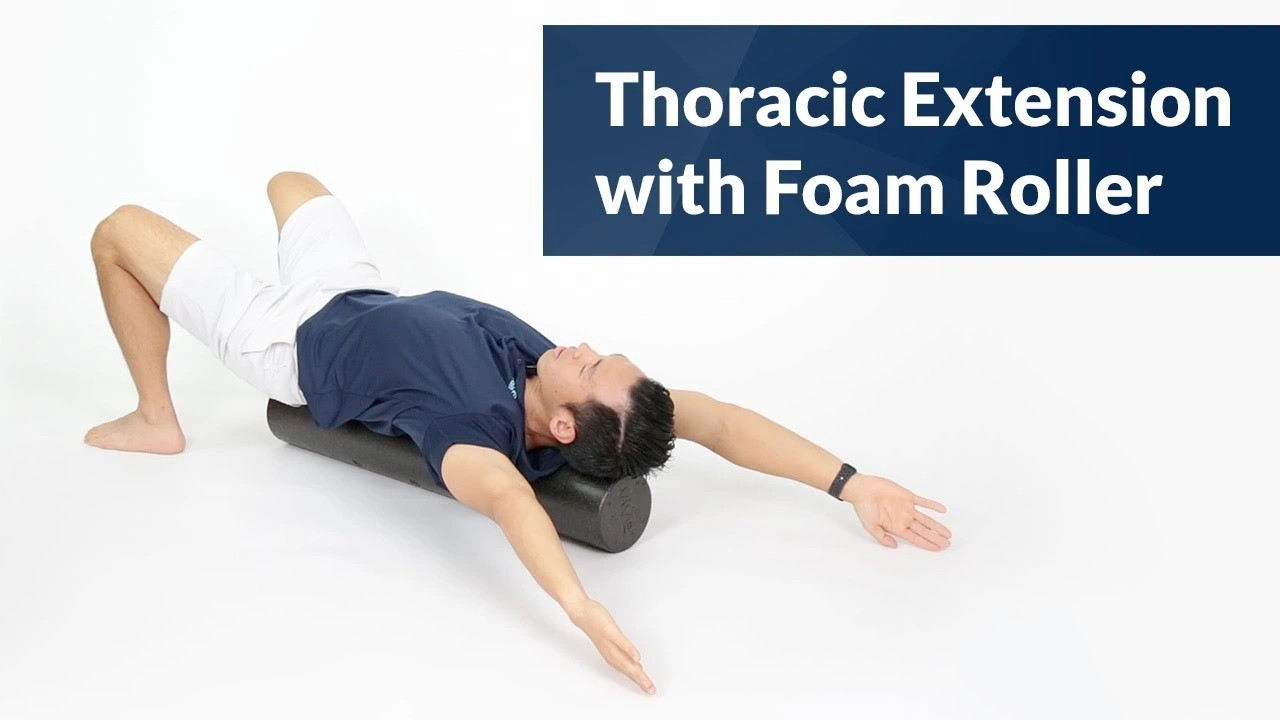
How to Perform Thoracic Foam Rolling Place the foam roller horizontally under your upper back, just below your shoulder blades, and sit on the floor. Keep your hips grounded at first to focus the stretch on your upper back. Interlace your fingers behind your neck for support and keep your elbows as far apart as possible. Tighten your core muscles to stabilize your lower back and prevent rib cage flaring, which moves unwanted movement into your lumbar spine. Lean back and extend your spine over the foam roller while you maintain ground contact with your hips. Repeat this extension several times at each position. Lift your hips off the ground next and use your legs to roll the foam roller along your upper back. Scan for tight spots. Lower your hips when you locate a restricted area, tighten your core, and repeat the extension movement to release tension. Focus on gentle movements that alternate between flexion, extension and slight lateral rotations. The entire routine takes 30 seconds to 1 minute.
Benefits of Thoracic Foam Rolling This mobilization improves upper back flexibility and reduces muscle tension. It also decreases lactic acid buildup after activity. Foam rolling helps release stiffness in individual vertebrae while it relaxes surrounding muscles. To cite an instance, biking enthusiasts find that improved thoracic mobility reduces lower back strain. The exercise improves spinal alignment and supports better posture by counteracting hours of slouching.
Common Mistakes to Avoid Your rib cage flaring indicates your lumbar spine is moving instead of your thoracic spine. This decreases effectiveness. Rolling onto your neck or lower back puts undue stress on vulnerable areas. Pushing too hard causes bruising rather than relief. Moving too quickly reduces the mobilization benefits.
Tips for Better Results Select a smooth, stiff roller with a 6-inch diameter and PVC pipe core. Soft rollers compress too much. Practice 1 to 4 times daily for 10 to 15 minutes total. Start with one 5-minute session and spend no more than 30 seconds on each spot unless you're simply stretching. Bring your elbows closer to your chest if tingling occurs in your hands.